For program version 1.2.2
1. Introduction
THIS PROGRAM IS NO LONGER IN DEVELOPMENT. NO FURTHER UPDATES! In August 2020 it became clear that the choice of programming languages and libraries lead to grave performance problems. Combined with the fact that this is hardly a unique program, a piano roll midi sequencer, it has been decided that no further development will happen. Here is the original description of the program:
Vico is a minimalistic Midi sequencer that is intended to be used in parallel with other software.
"Vico" (with c like ts in "bats") just means "sequence" or "order" in Esperanto for obvious reasons.
In a loop- or pattern based environment you often want to have a 'free flowing' track in order to create an instrumental solo, for example. Sometimes you just want to record a sketch or an idea quickly and not open or create an entire DAW project.
Vico fulfills these conditions by connecting exactly one source to one output, and records and plays back in between. Or to put it another way: you only get one track, intended for one instrument (but with convenient layers).
Vico has been written primarily for users of Patroneo, but has no closer technical bond. Patroneo is a program characterized by strict repetitions and constant reuse of very short patterns. With this you can quickly create whole arrangements for drums, bass and accompaniment chords, but a beautiful, long melody is extremely cumbersome. Therefore Vico wants to solve this problem.
However, all programs that run as JACK transport masters or JACK timebase masters are suitable as "remote control".
1.1. Basic Principles
Vico itself doesn’t create sounds and offers only a single output for JACK midi and organizes all events on up to ten layers, similar to graphics programs.
There is an input for JACK-Midi to which you can connect MIDI instruments or other programs.
At the start you see an empty track. The playhead is always at the point where JACK Transport is located.
The bar lines are also shown in the meter of the JACK master. If none present, there are no bars.
A red playhead indicates that you are in recording mode.
If transport is in progress, a midi keyboard or similar can be used to record events.
With mouse and keyboard all events can be set by hand and changed afterwards. (see below). With the exception of Velocity, all events are displayed in the main track.
To simplify things, you can switch a rhythm grid on and off as well as use a 'snap to grid' functionality.
All editing requires the creation of a selection by using the Shift and the left mouse button to draws a rectangle. A click with the right mouse button ends the selection.
Starting, saving, loading and closing your project is best done through the New Session Manager.
1.2. MIDI support
Vico supports all MIDI channel messages:
-
Notes (ON 0x80 and OFF 0x90 are combined to a rectangular note)
-
Control Changes (0xB0)
-
Program Change (0xC0)
-
Channel Pressure / "Monophonic Aftertouch" (0xD0)
-
Pitch Bend (0xE0 - only 7bit MSB)
-
Polyphonic Aftertouch (0xA0)
All messages can either be recorded live or entered manually. Post-production is possible for all channel messages.
The midi channel is discarded during recording. Instead, each layer has the option of setting a channel on which transmission takes place.
All non-musical events (0xF…) are ignored, including all MIDI transport messages (not JACK transport), tune requests, etc. The same applies to SystemExclusive events.
1.3. Mouse and keyboard shortcuts
All keyboard shortcuts can be found in the menus, there are no "secret" keys.
In contrast, mouse commands are not available in the graphical user interface and have to be learned here:
(LM = Left mouse button, RM = Right mouse button, Wheel = Move mouse wheel, MM = Middle mouse button, usually by pressing the wheel itself)
-
Shift + hold LM, move mouse: Draws a rectangle to select events.
-
RM on the background: Resets the selection.
-
LM on a selected event, then move mouse: Moves selected events up/down or left/right
-
Keep control (Ctrl) pressed: Moves left / right only
-
Hold down the Alt key: Moves only up / down
-
MM: Plays the note under the mouse pointer. There does not have to be an actual note, the position alone is enough. This is also possible on the piano.
-
RM on an event: Opens a menu with further commands.
-
Wheel: Scrolls the note area up and down.
-
Wheel, keep Alt pressed: Scrolls the note area left and right
-
Wheel on Velocities in the lower area: Changes the volume of the individual note, independent of the current selection.
-
Ctrl + Space: Starts playback at cursor position
2. Description of the graphical user interface and its functions
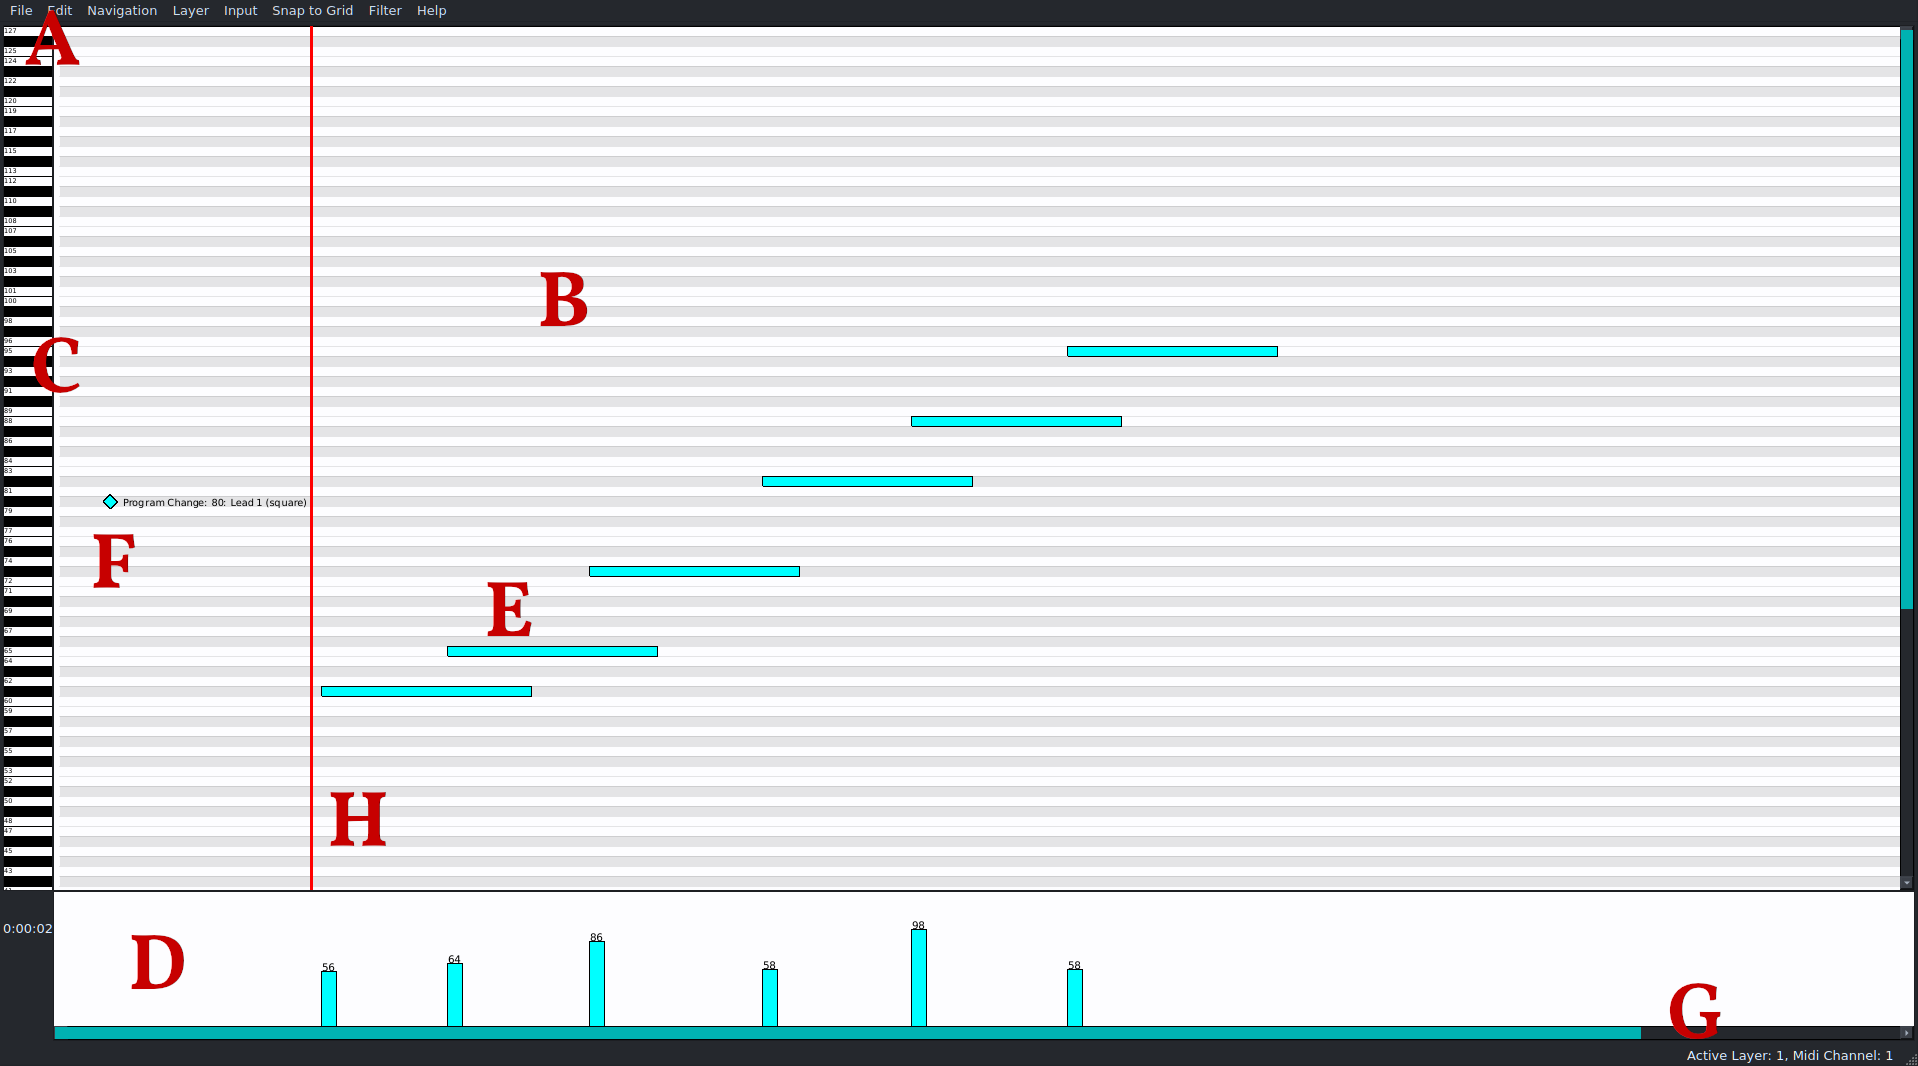
All points, and more, are discussed in detail below.
-
[A] Menu bar
-
[B] Main view (music and events)
-
[C] Piano
-
[D] Velocity View
-
[E] Some notes
-
[F] Another event, as an example
-
[G] Status bar with current layer and layers MIDI channel
Normally, when Vico is running in Agordejo (new-session manager), there is no internal way to exit the program. If you use options of your window manager like [X], Alt+F4 etc., the graphical user interface will only be hidden.
To really close Vico you can use Agordejo (New Session Manager). Here you can also restore visibility.
The current visibility setting will be saved.
3. Piano at the left side
At the left side of the program window is a rotated keyboard. It serves only as an orientation aid.
The numbers between 0 and 127 written in the keys are MIDI pitches. 60 is the middle C in this system.
If the middle mouse button is held down and the mouse is moved over the keyboard, the pitch sounds via the connected instrument.
4. Main View
The main view uses rhythm as a linear dimension (technically: midi ticks). This means that a note with the same duration always looks the same. If the tempo (BPM) changes, the playhead moves faster or slower. Conversely, this means that there can be no timeline where you can see at which second an event takes place.
4.1. Moving and Navigation
The mouse wheel scrolls the main view up and down. Pressing the Alt key scrolls forwards or backwards (left / right) instead.
The "Navigation" menu offers additional options.
4.2. Zoom and Scaling
If you hold down Ctrl and turn the mouse wheel, the main view becomes larger or smaller.
If you hold down Shift while turning , only the time axis will be scaled. Notes are compressed or stretched so that you can either see more at once or set more precise start and end positions.
Zooming and scaling is purely visual and has no effect on the music itself.
4.3. Layers
Notes are not organized in tracks, but in layers. There are ten of them. In the "Layers" menu, or with the function keys F1 to F10, the current layer can be selected.
4.3.1. Shadows
Layers lie on top of each other and obstruct each other. However, you can activate so-called shadows, which project another layer onto the current one. Shadows cannot be edited. All shadows disappear as soon as you change the active layer.
Shift+function key, e.g. F3, shows the third layer as shadow. F12 shows all as shadows.
4.3.2. Colors
Each layer can have a color, which can be selected in the layer menu. Mainly notes and events use this color. The mouse pointer is always in the inverted color.
4.3.3. Midi Channels
Channels are not properties of events. Each layer has its own midi channel, between 1 and 16, on which sending takes place. For a new project this is always channel 1.
When recording, all incoming midi channels are listened to, but the channel gets discarded immediately and changed to the respective layer channel.
5. Live Recording
Vico has a MIDI-in jackport to which you can connect any software or hardware instruments.
The input port will route everything immediately to the output port, regardless of Vicos internal state (recording or not), but with the channel of the current layer. Routing is done in real time.
To record something, the recording mode must be activated (Edit→"Toggle recording mode"). This is already the case when the program starts. A red playhead shows recording mode, a black one is just playback. JACK Transport must also be running. If neither is the case, Vico reacts, e.g. to notes, by just marking the pitch in color.
Since Vico always follows the JACK time-base (see below), the recording also takes place at this position. You can jump to the position in another program where you want to record a solo and press Play in this program. In principle Vico can be used like a program running in the background (which in fact works with NSM’s GUI hiding).
5.1. Layer Filter
It quickly happens that you record a plethora of events that make further editing extremely tedious. Imagine, additionaly to a melody there is also MIDI aftertouch on every note, and the Modwheel (CC) is also used. The whole screen will be full of symbols.
In the "Filter" menu are several ways to sort and move events.
The simplest usage is to use a filter for all layers and only set the event type, e.g. aftertouch. Now all aftertouch events will be moved to the current layer.
In addition, you can of course set the target layer yourself. It is also possible to define the respective MIDI bytes as upper and lower limits.
Example: Event type "Note" with Byte1 Minimum 0 and Maximum 59 moves all low notes, e.g. the accompaniment of a piano piece, but all high notes remain on the target layer.
The other menu commands in "Filter" offer variations, but work in the same way.
5.2. JACK Transport and Timebase: Bar lines
Vico was constructed with the declared goal of running as slave in a session. If you start it alone you can of course record and use all functions, but you cannot see barlines and it’s a little harder to find the right positions.
If there is a program that acts as JACK timebase "master" Vico will follow its time signature and transport position.
With "Edit"→"Show rhythm lines in grid" (key L) you can switch off bar lines completely.
Vico has no predetermined duration. The main view has practically infinite dimensions, and you always work where all other programs are.
As soon as Transport is running, the main view jumps to Playhead unless Edit→"Follow Playhead" is disabled.
Starting and stopping the transport is possible from any running JACK program, including Vico itself. (space bar)
6. Notes and events
If you want to insert notes and events with mouse and keyboard and not record them via MIDI instrument, the menus "Input" and "Grid" offer numerous ways.
Events are always sent on the midi channel of their respective layer.
6.1. Notes
When the program starts, the mouse pointer is a small rectangle with a text indicating the pitch. This is the mode for entering notes of arbitrary length. By holding down and dragging the left mouse button you can draw notes. You must first move the mouse pointer to the correct pitch. and then start drawing.
Fixed durations are available in the "Input" menu. These can be selected with the number keys. After key "1" a click with the left mouse button inserts a whole note, with key "2" a Half note etc. "0" selects the free mode again.
Dotted note lengths can be switched on and off for all fixed durations.
Inserted notes have an average velocity (median) of all previous notes.
6.2. Other Events
All other events can also be inserted with the mouse. This may not be very convenient or fast due to large amounts of data, but it is at least possible. A live recording is probably preferable.
6.2.1. Control Changes (0xB0)
First you have to select the CC type in a submenu, e.g. "Volume (CC7)".
The height in the main view determines intensity from 0 to 127.
If you want to set control changes of another type you have to select the menu entry again (or press the shortcut).
Control Changes cannot later change their type, e.g. from Modwheel to Volume. They would have to be deleted and recreated.
6.2.2. Program Change (0xC0)
To change the program to select another instrument, simply set the event to a position. The label indicates the program number and the General MIDI instrument. If the connected JACK-instrument does not follow MIDI-naming, you can ignore the names.
6.2.3. Channel Pressure / "Monophonic Aftertouch" (0xD0)
Channel Pressure presents itself as a simple X without further labeling or selection. The "higher" its position, the more intense.
6.2.4. Pitch Bend (0xE0 - only 7bit MSB)
Pitch Bend presents itself as a small circle without further labeling or choices. The "higher", the more intensive.
6.2.5. Polyphonic Aftertouch (0xA0)
First you have to select, in a submenu, the note for which you want Aftertouch to apply. Then you can insert the event. Intensity is, again, the "pitch". If you want to set Polyphonic Aftertouch for another note you have to select the menu entry again (or press the shortcut).
Polyphonic Aftertouch cannot later change their relation to a pitch. They would have to be deleted and recreated.
7. Editing and Moving Events
All events can be edited after inserting. If tidiness has been established by using layers, maybe through filters, editing becomes much easier.
Writing text annotations is the only function in the main view that does not require creating a selection.
Everything else requires selected events, even if it is only one.
7.1. Text Annotation
If no selection exists at the moment, the right mouse button can be used to write a text annotation on an event. It has no effect on the music.
7.2. Selections
First of all, right-clicking is the best way to deselect your selection.
If you hold down the Shift key, the input-event symbols disappear from the mouse pointer. Instead, you get the normal pointer and can press, hold and drag a rectangle to select events.
Additionally marked events will be added to the existing selection.
The selection can extend over several layers.
The main view scrolls automatically when you move the mouse pointer to the left or right edge. But often zooming out is the better way to mark many events at once.
The "Edit" menu offers the possibility to select the whole layer (Ctrl+A) or even all layers (Ctrl+Shift+A)
7.2.1. Invert selection
If you use the Ctrl key instead of Shift, the selection is inverted: Selected notes are deselected, all others become marked.
This is especially useful if you want to remove single notes from a selection, for example after Ctrl+A.
7.3. Change event position
By pressing / holding / dragging with the left mouse button, all events can be moved both in their timeline position (left/right) as well as their pitch or event intensity (up/down).
If you hold down the Alt key, events only move to the left/right, no matter if the mouse also moves up and down. This increases control and prevents slips in pitch.
If you hold down the Ctrl key, events only move up/down, no matter if the mouse also moves to the left or right. This increases control and prevents slippage in the Position in time.
You can also use the arrow keys to move events step by step in all directions. This method is sometimes the fastest and most accurate.
7.4. Changing Note Durations
The duration of notes in the selection can be changed both to forward and backward. To do this, you can move the mouse to the left or right edge of a note with the left mouse button (push/hold/pull). All selected notes are changed by the same amount.
There is a minimum duration that cannot be shortened. Only one of the selected notes has to meet this minimum duration in order to stop the entire process.
If non-notes are selected at the same time, they are ignored during the process.
7.5. Snap to Grid and Positions
The "Snap to Grid" menu allows you to place events on a fixed position. When the program is started, the grid is initially switched off: free positioning at any time position is possible.
Like the number keys set note duration, Shift+numbers set the grid-rhythm for snapping. A quarter note grid allows only events and notes on quarter note positions.
Setting Snap To Grid to eighths or sixteenths notes is usually a good compromise between robust input and rhythmic flexibility.
With free note duration (Shift+0), the beginning is bound to the grid, but the end is free.
When modifying note durations, the grid is active.
7.6. Change Note Volume / Velocity
In the main view, you can only change the volume of notes using menu commands. Another option is the Velocity View (see below).
The "Edit" menu offers several options: You can increase or decrease velocities step by step. The keyboard shortcuts are + and -.
There is also a command that allows you either to change all notes relatively or to set all notes to a fixed value. If you write a "+" or "-" in front of the value in the input line the change is considered relative.
Example: "+23" increases all velocities by 23, "23" sets all to 23, "-42" decreases all by 42.
Caution! It is technically allowed to have velocities smaller than 0 and larger than 127. This is not musically possible and must be observed and corrected by hand.
A further command is to "compress" velocities. All velocities are compressed proportionally into a new boundary. For example: Velocities 0 (lowest), 64 (middle) and 127 (highest) are compressed to value between 70 and 90. We get: 70 (lowest), 80 (middle), and 90 (highest).
All these commands ignore non-notes.
7.7. Copy, Cut, Paste
As in almost all programs there are copy, cut and paste. The usual shortcuts are used: Ctrl+C, Ctrl+X, Ctrl+V.
Selected notes are copied to a background buffer with Ctrl+C; Ctrl+X deletes the original selection. Since the selection can span several layers, one can also copy from multiple layers.
Ctrl+V inserts a copy at the same place. It is possible to change the layer to insert a copy.
If you insert notes on the same layer, the notes overlap initially, so they are "invisible"! But only one set of notes is selected! This means that you can move notes immediately.
7.8. Undo changes / Undo & Redo
Ctrl+Z ("Undo") reverts the last change.
Ctrl+Shift+Z ("Redo") cancels the last undo, i.e. goes back one step (…forward?). If you have changed something in the meantime, Redo is no longer possible.
Undo is only possible to the state of the program start.
8. Velocity View
The velocity view is located at the bottom of the program window. It serves as an overview of volume and also allows you to change individual notes.
The special characteristic of this view is that it only displays notes and no other events, and secondly only selected notes are displayed. Even individual chord members can be reviewed without obstruction from other notes.
The velocity view shows all notes below their starting position in the main view, i.e. scrolls at the same rate. Each column is a note. The rhythm is not displayed; all columns have the same width.
If the mouse cursor hovers over a column, the mouse wheel will change velocity in steps of two for exactly that one note. To change the velocities of all selected notes at once, you must use the menu commands in the Use "Edit" menu (see above)
9. Miscellaneous for Advanced Users
9.1. Parameters and Settings at the Beginning of the Track
There is no hidden data or settings. Everything Vico sends is also visible to the user. This means above all that there are no default values for a songs beginning.
For example: In a piece for Violin you change the instrument to a Viola (Program Change) at the end of the piece. If played back from the start it will still be the Viola, because the connected JACK-instrument did not receive a message to switch to a Violin.
Therefore you have to set the violin explicitly at the start. The same applies to pitch bend or control changes such as piano pedal, modwheel, expression etc..
9.2. High Resolution MIDI Parameters (MSB and LSB)
Some MIDI parameters are 14bit instead of the usual 7bit. They are built from two values. This is standard midi practice and must be learned from another source. For Vico, these values must also be set as two separate 7bit entries.
9.3. Overlapping Notes
The MIDI format does not forbid a Note-On to be followed by another Note-On of the same pitch without a Note-Off having occurred beforehand. It does not make much musical sense in most cases, but it is permitted by the MIDI standard and therefore supported by Vico. In general you should try to avoid overlapping notes of the same pitch (even on multiple layers if they share the same midi channel).
9.4. Control changes are upside down in Vico.
Wise MIDI-owls know: MIDI messages have two parameters (Byte1 and Byte2). For notes, byte1 is pitch and byte2 velocity. For control changes byte1 is the type (e.g. volume) and byte2 the intensity. But in Vico, CCs show Byte2 as pitch, so you can actually shift them up and down.
9.5. Rounding Error: My Notes are at the Wrong Position
Mathematics and computing cannot be cheated anymore at some point. With extreme scaling (Ctrl+Shift+Mouse wheel), when notes are very strongly compressed and 64th notes get placed on a 64th grid, rounding errors may occur and thus mispositioning will happen by a few pixels or midi ticks.
Solution: Change the scaling, display notes more stretched.
10. Installation and Start
Vico is exclusive for Linux. The best way to install is to use your package manager. If it is not there, or only in an outdated version, please ask your Linux distribution to provide a recent version.
If available in the package repository, please continue reading directly at "Start vico from Agordejo / New Session Manager". If not, you can build Vico yourself.
-
Please check the supplied README.md for dependencies.
-
You can download a release or clone the git version
-
Download the latest version from https://www.laborejo.org/downloads and extract it.
-
git clone https://git.laborejo.org/lss/vico.git
-
-
Change into the new directory and use these commands:
-
./configure --prefix=/usr-
The default prefix is /usr/local
-
-
make -
sudo make install
-
Run
agordejo -
Press the
Newbutton, and enter a name for your piece of music. -
Use the launcher to add
vicoto the session. -
Add any compatible programs, e.g. synthesizers.
Please read README.md for other ways of starting vico, which are impractical for actual use but can be helpful for testing and development.
11. Help and Development
You can help Vico in several ways: Testing and reporting errors, translating, marketing, support, programming and more.
11.1. Testing and Reporting Errors
If you find a bug in the program (or it runs too slow) please contact us in a way that suits you best. We are thankful for any help.
-
Report bugs and issues: https://www.laborejo.org/bugs
-
Website: https://www.laborejo.org
-
E-Mail: info@laborejo.org
-
If you see the opportunity and know that a developer will read it also forums, social media etc..
11.2. Programming
If you want to do some programming and don’t know where to start please get in contact with us directly. The short version is: clone the git, change the code, create a git patch or point me to your public git.
11.3. Translations
Vico is very easy to translate with the help of the Qt-Toolchain, without any need for programming. The easiest way is to contact the developers and they will setup the new language.
However, here are the complete instructions for doing a translation completely on your own and integrating it into the program. The program is split in two parts. A shared "template" between the Laborejo Software Suite and the actual program.
The process is the same for both parts, but needs to be done in different directories:
template/qtgui and plain /qtgui, relative to the root directory, where the vico executable is.
Everytime you see "template/qtgui" below you can substitute that with just "qtgui" to translate the other part of Vico.
You can add a new language like this:
-
Open a terminal and navigate to template/qtgui/resources/translations
-
Edit the file
config.prowith a text editor-
Append the name of your language in the last line, in the form
XY.ts, where XY is the language code. -
Make sure to leave a space between the individual languages entries.
-
-
Run
sh update.shin the same directory-
The program has now generated a new
.tsfile in the same directory.
-
-
Start Qt Linguist with
linguist-qt5(may be named differently) and open your newly generated file -
Select your "Target Language" and use the program to create a translation
-
Send us the
.tsfile, such as by e-mail to info@laborejo.org
You can also incorporate the translation into Vico for testing purposes. This requires rudimentary Python knowledge.
-
Run the "Release" option in QtLinguists "File" menu. It creates a
.qmfile in the same directory as your.tsfile. -
Edit
template/qtgui/resources/resources.qrcand duplicate the line<file>translations/de.qm</file>but change it to your new .qm file. -
run
sh buildresources.sh -
Edit
engine/config.py: add your language to the line that begins with "supportedLanguages" like this:{"German": "de.qm", "Esperanto: "eo.qm"}-
To find out your language string (German, Esperanto etc.) open the
python3interpreter in a terminal and run the following command: -
from PyQt5 import QtCore;QtCore.QLocale().languageToString(QtCore.QLocale().language())
-
To test the new translation you can either run the program normally, if your system is set to that language. Alternatively start vico via the terminal:
-
LANGUAGE=de_DE.UTF-8 ./vico -V --save /dev/null